Many users encounter power light blinking problems in their HP printer, but don’t know how to solve it. That’s because blinking light in a HP printer can be caused due to multiple issues and you should know the right solution for each problem. In this guide, we will provide solutions for several HP printer problems, which will help you learn how to fix when HP printer power light keeps blinking problem on your printer.

Advertisement
How to Determine the Actual Problem
If you see that the power light is blinking on your computer, then before trying any solution you must determine the actual cause behind the problem. If your printer is displaying some error code or showing an error message, then you can easily determine the actual problem. Otherwise, follow the three-step process below to determine the problem that is causing the power light blinking error. I have tested this on many printers and it worked very well.
- Recognizing Blinking Button/Light: Start by identifying the function of the button whose light is blinking. There are eight types of buttons/lights on an HP printer, which are the ink level light, the cancel button, the power button/light, the resume button/light, the start copy color button, the wireless button/light, the information button/light and the start copy black button. The blinking light on each of these buttons is due to a different problem with your printer.
- Determining Light Blinking Pattern: Once you have identified the right button, it’s time to check the light blinking pattern. Sometimes the light blinks at equal intervals, while sometimes it blinks in a particular pattern. Each of these situations may mean different problems in your printer, like paper jam, front cover being opened, maintenance issues, etc.
- Finding the Actual Problem: With the information gathered from the above steps, you should check your printer’s user manual for details about the blinking pattern, or else, a simple Google search mentioning the blinking pattern with the HP printer model number can give you a lot of information about the error.
Once you have determined the actual problem which is causing the light blinking issue on your printer, you can apply the necessary fix to resolve the issue.
How to Fix When HP Printer Power Light Keeps Blinking
Now that you know what is causing the light blinking error on your HP printer, it will be easier for you to choose and apply the right solution. We have shared below some commonly applied solutions for 7 such printing errors.
Fix Paper Identification Problem – Clean Sensors
If your printer is unable to identify the paper or label you have placed in the input tray, then either you have placed the wrong paper type or wrong paper size on the paper input tray, or your print mode settings are not set properly to print the printing paper/label placed by you in the input tray.
- If the printing paper type or size is wrong, then replace them with the right type and size of pages.
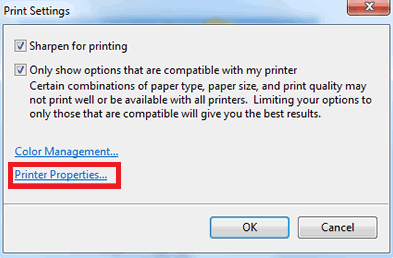
- If the printing paper/label is correct, then the error is caused due to incorrect print mode settings. Go to Print Settings, then click on the “Printer Properties” option.

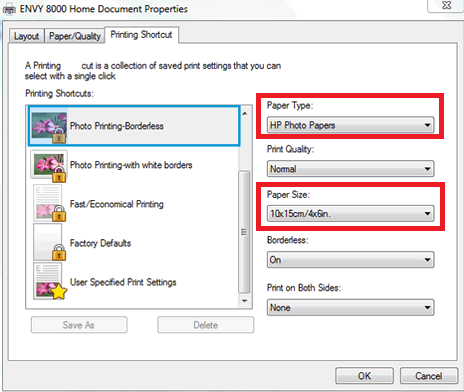
- In the Printer Properties window, find the right tab and change the ‘Paper Type’ and ‘Paper Size’ settings according to the paper type and size you have placed in your printer’s paper input tray.

After finalizing the above changes, try to print with your HP printer and it should work normally.
Fix Wireless / Network connectivity problem
If your printer is suddenly showing that it’s unable to connect to the wireless network, then you may have to hard reset your printer. Follow the steps given below:
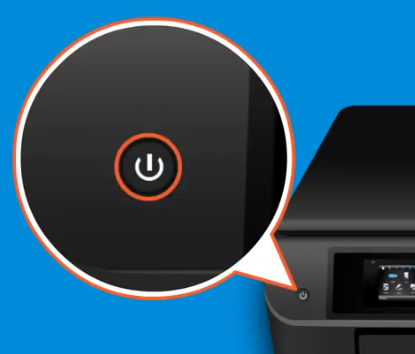
- Press the ‘Power’ button to switch off your printer.

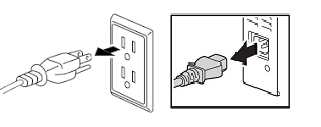
- Pull out the power cord from the back of your printer and from the power socket.

- Wait for 30 seconds, then reconnect the power cord to the back of your printer and the power socket.

- Restart your printer by pressing the ‘Power’ button.
- If your printer has a Resume button, then press the ‘Resume‘ button for 20 seconds until the ‘Attention’ light turns-on, then release it.


That’s it, you have reset your HP printer. Also, its better to check the wireless router to ensure that it’s working properly.
Close all Covers / Lid
If the HP printer is showing an error because its cover lid is open, then follow the steps given below.
- Close the cover of your printer after thoroughly inspecting that its path is not blocked due to some object.


You should always keep the cover of your printer properly closed.
Clean Ink Cartridges
This error occurs when one of your installed print cartridges is incompatible/incorrect. Follow the solution given below to resolve this error:
- Open the cover of your printer and remove one cartridge, then close the cover and try printing with your printer.

- If the printer prints properly, then the error was caused due to the cartridge you removed. Otherwise, replace that cartridge and try the above step with other cartridges one-by-one.
- Once you find the problematic cartridge, then you should clean the cartridge properly with distilled water and replace it in the printer.

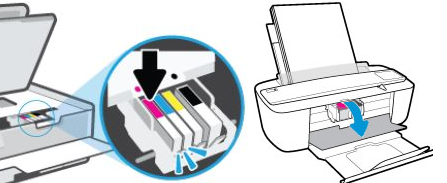

If cleaning the cartridge doesn’t work, then you may have to install a new cartridge.
Reload the papers
If you are facing an error because there is no paper in your printer, then put more papers into the input tray.
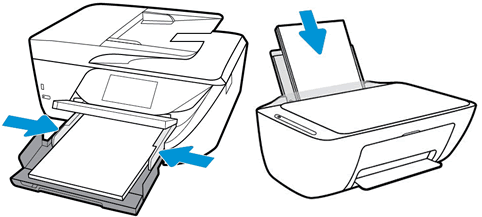
This error is sometimes caused when there are too few pages in the input tray.
Clean Paper Jam
Paper jam error can be resolved by following the below mentioned steps:
- Open the back cover of your printer.

- Remove any paper or debris stuck at the back.

- Gently clean the print rollers with a soft cloth which is dampened in distilled water.

- Also, open the top cover of the printer and make sure that the cartridge carriage path has no obstructions and the carriage is moving freely.


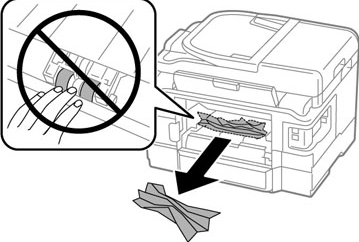
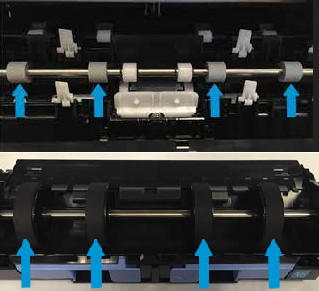

Paper jam error is an uncommon issue, but is easy to resolve.
Replace Ink Cartridges with new one
This error is caused when only one ink cartridge is installed in your printer. The following steps can solve this problem:
- Insert the missing cartridge into its place.

- If you have placed a new cartridge, then make sure that its tape is removed.


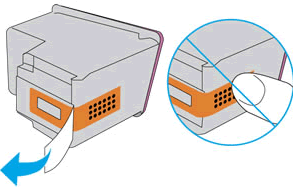
It’s essential that you follow the above steps before installing any new cartridge in your printer.
Now you know how to fix it when the HP printer power light keeps blinking problem. However, if the above solutions didn’t solve your problem, then you should reach out to HP technical support for maintenance.