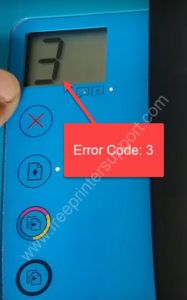
Have your HP Ink Tank printer suddenly stalled during a print job and its control panel display screen is showing the letter ‘E’ and number ‘3’ alternately? Then, you are encountering ‘Error 3’ in your HP Ink Tank printer. It may seem that your print job is stuck and there is no way out, but don’t worry, because there is a simple solution to this error which can restore your printer’s normal operations in just a few minutes. In this guide, we will tell you how to fix Error 3 in HP quickly.
What Causes Error 3 in HP Ink Tank Printer?
The primary cause behind the Error 3 or E3 error in a HP Ink Tank printer is the stalling of its cartridge carriage, which means the ink cartridges are unable to move. That’s why, this error is also known as the ‘Carriage Jam’ error. There can be many reasons why the cartridge carriage in your HP Ink Tank printer has suddenly jammed, but the most common ones are listed below.
Advertisement
- Obstruction in Carriage Path: Sometimes crumpled paper or dislodged labels obstruct the path of the cartridge carriage, which makes it difficult for the carriage to move freely and causes a carriage jam.
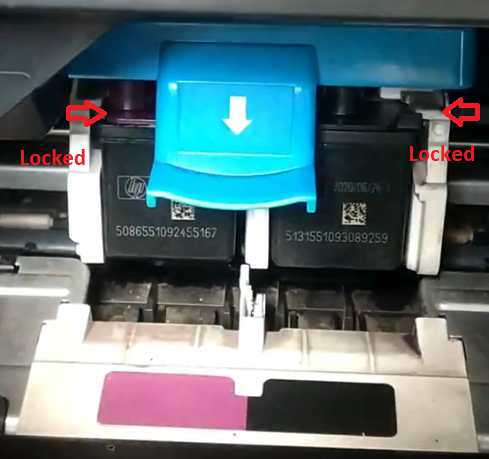
- Carriage Latch is Opened: There is a blue colored carriage latch on the cartridge carriage, which is there to cover the ink cartridges and to hold them together. If due to some reason this carriage latch is opened, then the cartridge carriage will not move.
- Loose Ink Cartridges: If you have not inserted your ink cartridges correctly in their slots, then after long print jobs they might get displaced in their position. In such a situation the cartridge carriage will stop moving.
When checking the cartridge carriage of your HP Ink Tank printer you must make sure that none of the above problems exists.
The error 3 in HP Printers is a problem in the cartridge. To fix it, you should first remove the cartridge. Then, use a paper clip to press the reset button for at least 10 seconds. After that, install the cartridge again and you issue should be fixed.
How to Fix Error 3 in HP Ink Tank Printers?
In order to fix E3 error in HP Ink Tank printer you need to follow the instructions given below in their correct order.
- When you switch on your printer. The display screen must be blinking ‘E’ and ‘3’ alternately. Also, the LED in front of the ‘Print Head’ symbol and ‘Resume’ button are blinking. The ‘Power’ LED is solid and not blinking. These are symptoms of Error E3 in HP Ink Tank printer.

- While the printer is still turned on, open the exterior door and the print head access door of your HP Ink Tank printer.

- Now you will see that the ‘Power’ button LED will start blinking, which is a sign that the front doors have been opened.

- Check the cartridge carriage on your printer. In our case, we can clearly see that the carriage latch is opened. All we need to do is to ‘Gently Press’ the carriage latch down so that its locked properly.
In your printer if the carriage latch is locked, then check that the ink cartridges are properly set at their place and there is no obstruction in the carriage path. If you are unsure about what to do, then gently remove the ink cartridges and properly replace them in their original position.

- When you see that the carriage latch is properly locked, then move to the next step.

- Close the print head access door.

- Close the exterior door of your HP Ink Tank printer.

- Press the ‘Resume’ button on the printer control panel.

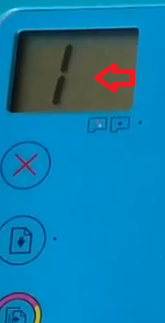
- You will see ‘0’ in the control panel display screen and the ‘Power’ LED will turn solid white. Now, press the ‘Copy’ button on the control panel.

- You should see ‘1’ flashing in the control panel display screen. Wait for the printer to print the page.


That’s it, you have successfully fixed the Error 3 in HP Ink Tank printer. If you would have followed the above-mentioned instructions properly, then it would have taken around 2 minutes to complete the whole process.
Conclusion
Many users are confused about how to fix Error 3 in HP Ink Tank printer, but the actual solution of this problem is really simple to implement and doesn’t require more than 2 minutes to complete. We have shared the whole process in this guide, but you must read the steps carefully and execute them in their correct order to get desired results.
Error code 0 with exclamation ! Mark in between zero . And Red light blinking