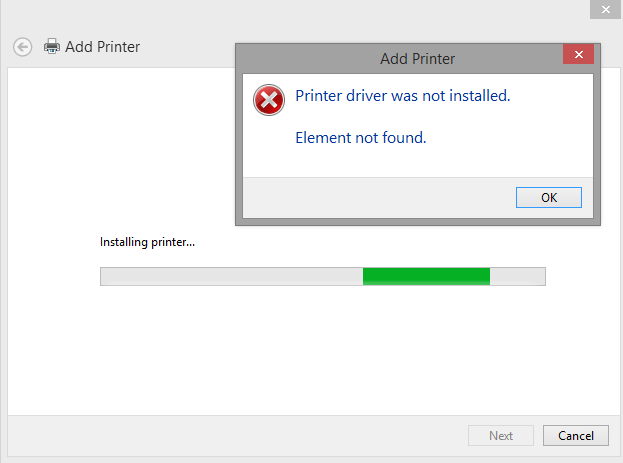
Sometimes while installing or upgrading your printer driver on your Windows computer, you encounter with an error “Printer driver was not installed. Element not found.” There are some variants of this error as well, but the end result you get is the same, which is, your inability to upgrade or install your printer driver. If you are looking forward to fix this error, then this tutorial will definitely end your search for good.
Why “Printer driver was not installed. Element not found.” Error Occurs?
Windows has a safety feature which checks the driver signature of every driver before installing it on your computer. Due to this safety feature, sometimes your Windows OS is unable to verify the authenticity of your device driver and stops it from getting installed on your computer. As a result of this you get an error saying the printer driver installation failed and Windows was unable to find the element. There are some variants of this error as well, like the one that says “A problem was encountered while attempting to add the driver to the store.”
Advertisement

How to Fix “Printer driver was not installed. Element not found.”
The solution for this problem is simple. First, you need to disable the driver signature enforcement feature on your Windows operating system, then you will have to install your printer driver manually. The whole process may seem complicated, but don’t worry we have simplified this process below so that you can easily execute it without making any mistake.
The steps given below are for Windows 10 OS, but you can follow the same method for other Windows OS versions as well.
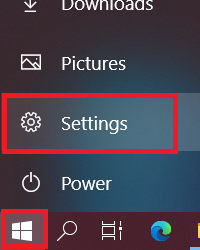
- Click on the ‘Start’ button and choose ‘Settings’ from the menu.

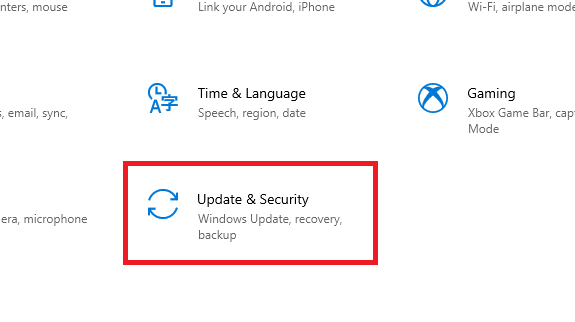
- Click on ‘Update & Security’ option on the Settings page.

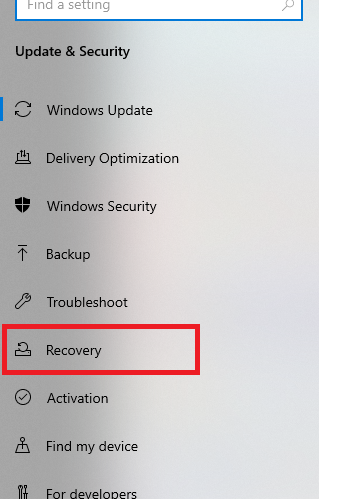
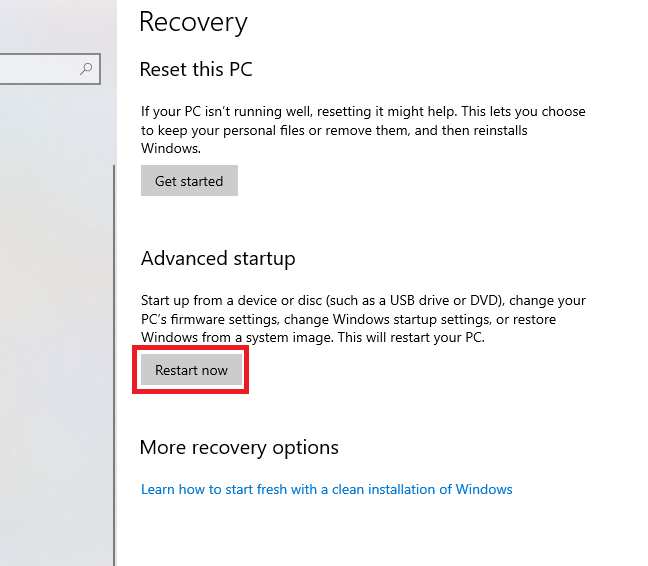
- Under Update & Security section, choose ‘Recovery’ option.

- On Recovery page, click on ‘Restart now’ button in the Advanced startup section.

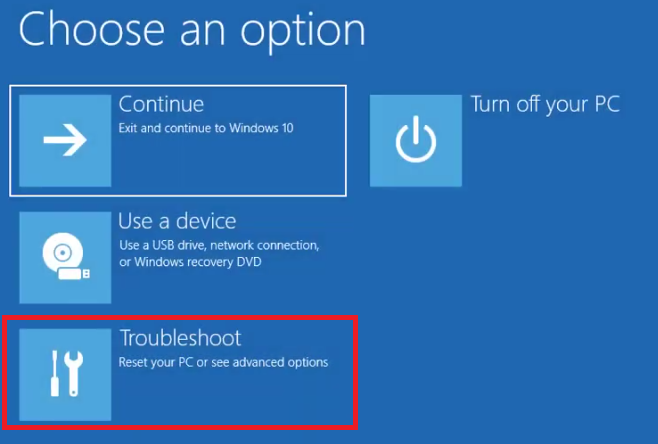
- Choose ‘Troubleshoot’ option from the available options.

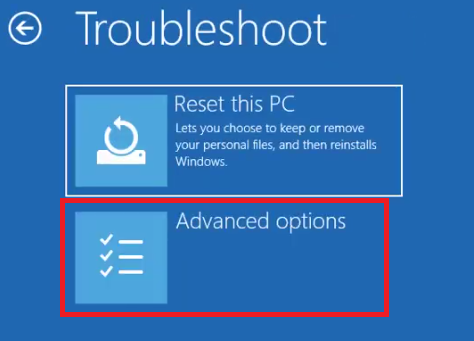
- Under Troubleshoot, select ‘Advanced options’.

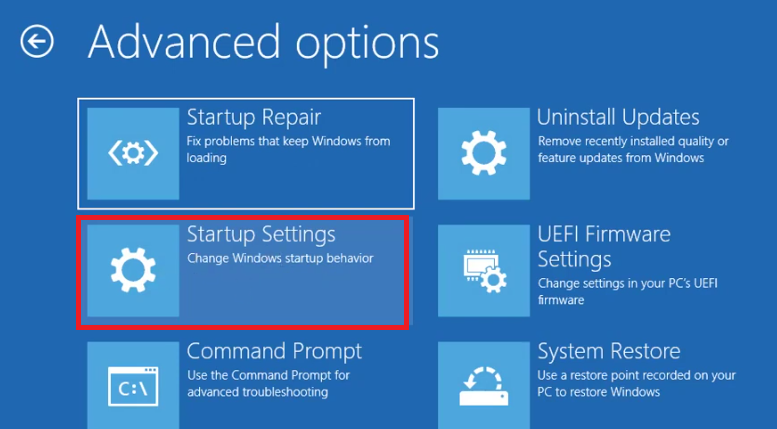
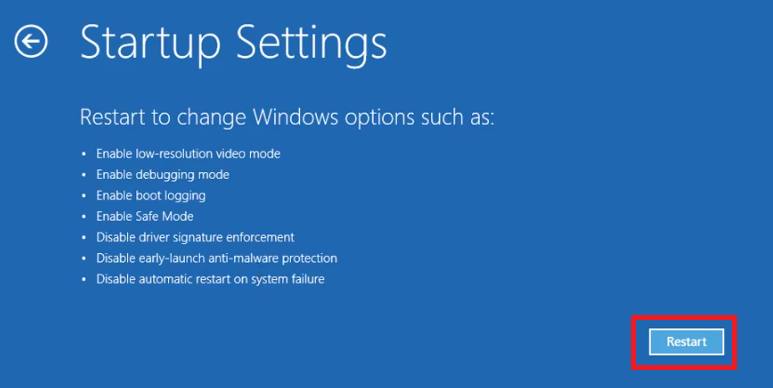
- In Advanced options, click on the ‘Startup Settings’ to proceed.

- In Startup Settings screen, click on the ‘Restart’ button.

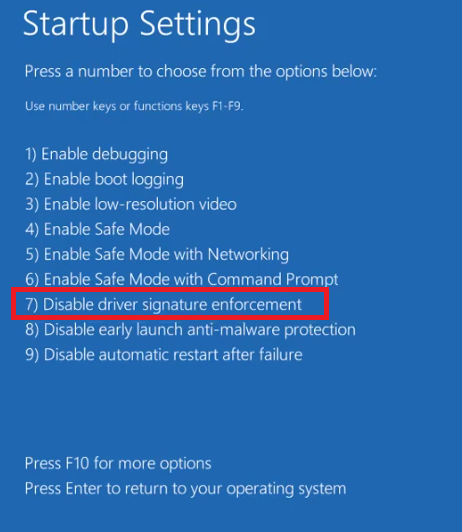
- Now, press ‘F7’ key on your keyboard to choose the ‘Disable driver signature enforcement’ reboot option.

- Wait for your computer to restart. After your computer has restarted click on the ‘Start’ button and select ‘Settings’ from the menu. Before starting the driver installation process given below make sure that your printer is switched on and properly connected with your computer through the right port.
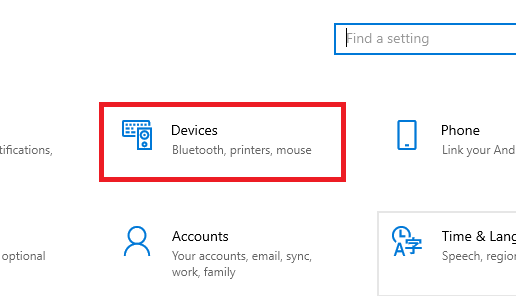
- Choose ‘Devices’ option in the Settings page.

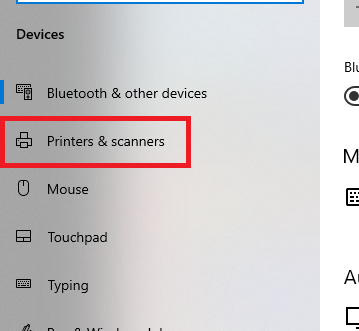
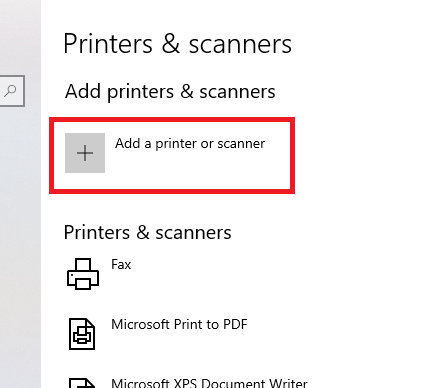
- Under Devices, click on the ‘Printers & scanners’ option.

- Click on ‘Add a printer or scanner’ link in the Printers & scanners page.

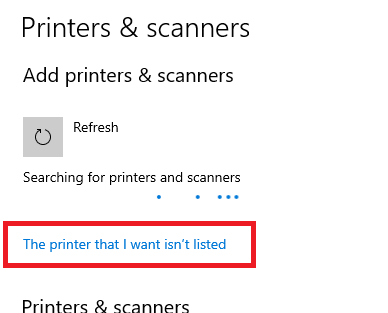
- Wait for the Windows to search for the printer. Finally, click on ‘The printer that I want isn’t listed‘ link when it appears.

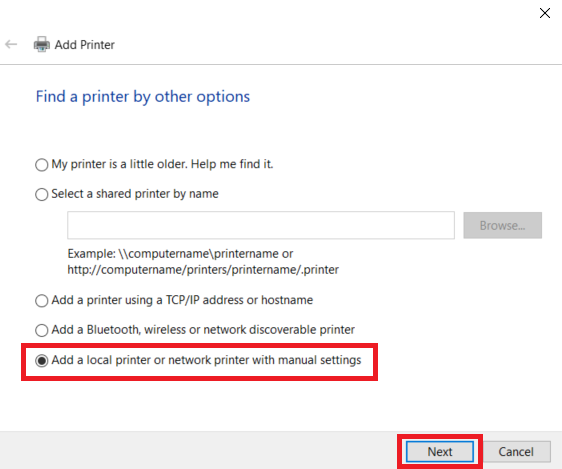
- In the Add Printer window, select the ‘Add a local printer or network printer with manual settings’ option and click on the ‘Next’ button to proceed.

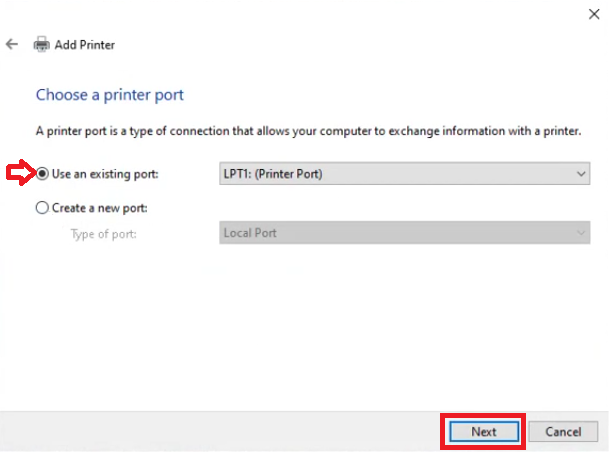
- You can click on the ‘Down’ arrow in front of the ‘Use an existing port’ field to choose the port where you want to install your printer. Since, we will install our printer on ‘LPT’ port, we have selected accordingly. After choosing the port type, click on the ‘Next’ button.

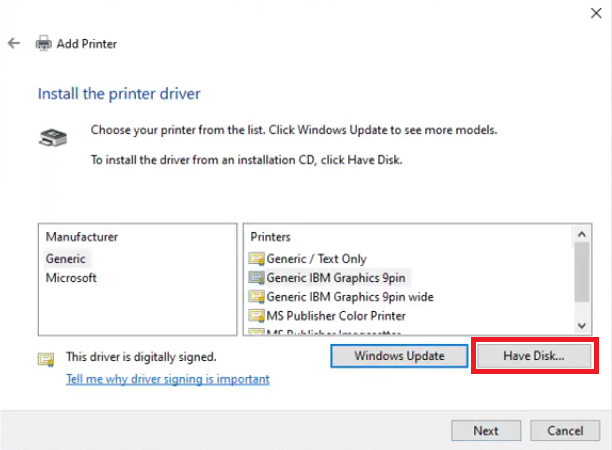
- Click on the ‘Have Disk’ button to continue with the driver installation.

- Click on the ‘Browse’ button.

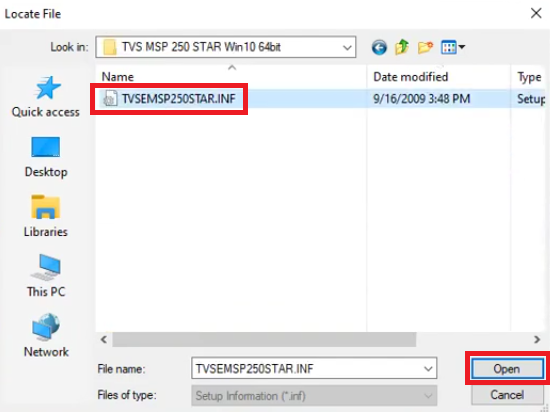
- In the Browser window, go to the folder where driver files have been extracted, then select the appropriate driver file and click on the ‘Open’ button.

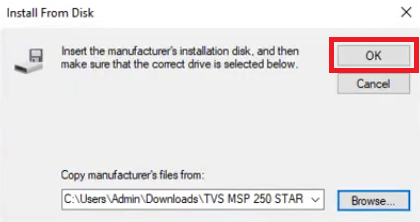
- Click on the ‘OK’ button to proceed with the driver installation.

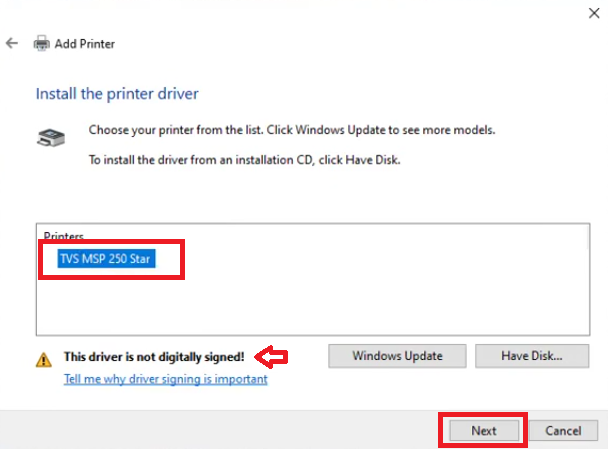
- Select the name of your printer from the list and click on the ‘Next’ button to proceed. You may see the error ‘This driver is not digitally signed!’, just ignore this error.

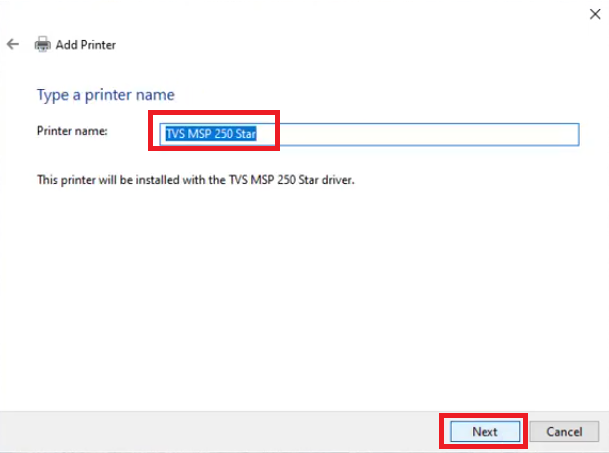
- If you want you can enter the name for your printer or leave it unchanged, then click on the ‘Next’ button to move ahead.

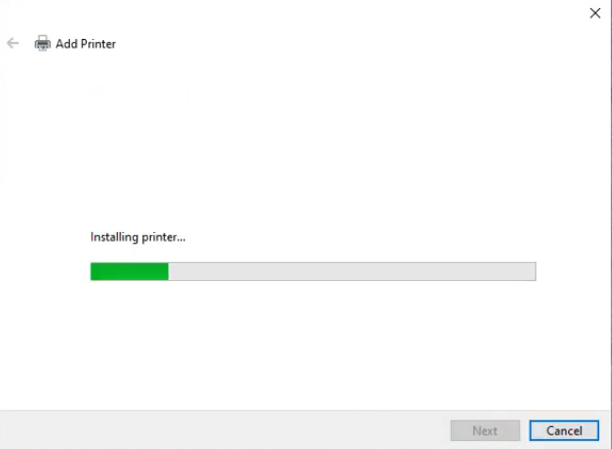
- Wait for the driver to install on your computer.

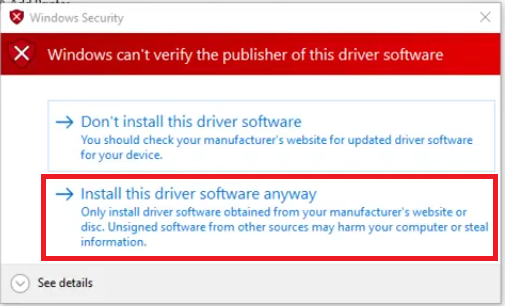
- If you see the error that Windows is unable to verify the driver publisher, then ignore this error and click on ‘Install this driver software anyway’ option.

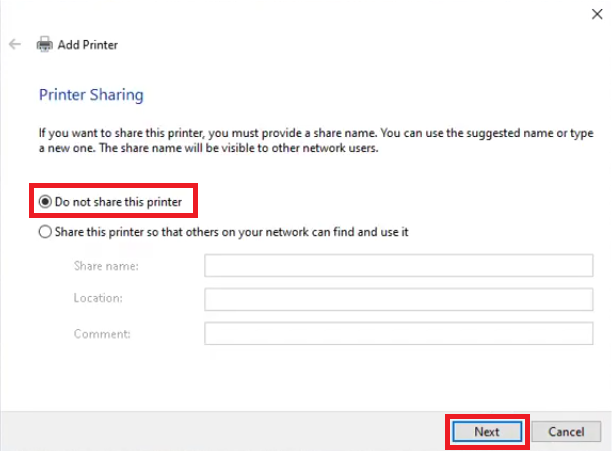
- If you want you can share your printer over a network, otherwise, choose ‘Do not share this printer’ option and click on the ‘Next’ button to continue.

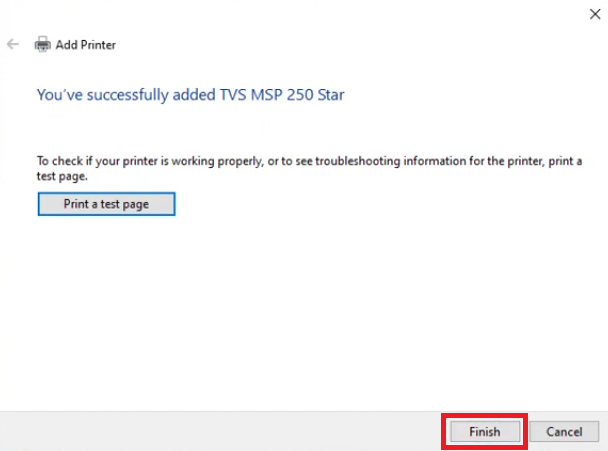
- Now, you will see that your printer has been successfully added. If you want you can click on ‘Printer a test page’ to check the installation of your printer, otherwise, click on the ‘Finish’ button to complete the driver installation process.


That’s it, you have fixed the “Printer driver was not installed. Element not found.” error on your computer and have successfully installed your printer driver.
Conclusion
Now you know how to fix “Printer driver was not installed. Element not found.” error on your Windows computer. Although this error may seem complicated to resolve, but if you follow the above mentioned steps in the correct order, then you can easily resolve this error on your computer.